Congratulations on
choosing Homeport as your means of secure, convenient home delivery.
Now you need never wait
in again!
ORDERING
GOODS & SERVICES page 2
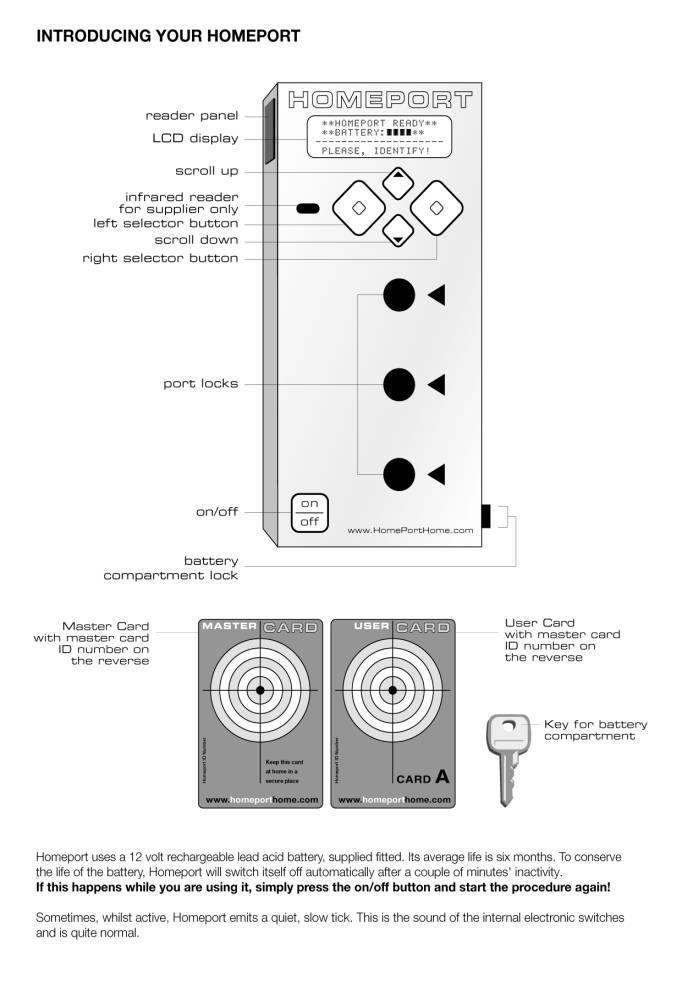
INTRODUCING
HOMEPORT page 3
HOW
TO USE HOMEPORT – page 4
QUICK
REFERENCE GUIDE
HOW
TO USE HOMEPORT –
DETAILED
GUIDE
Releasing
your box page 5
Plugging
the empty box back in page 6
Getting
the empty box back again page 7
Returning
unwanted goods page 7
Arranging
dry cleaning page 8
Making
your Homeport more secure page 9
Getting
access using the PIN page
12
Dealing
with ‘alien boxes’ page
13
Help page
13
ORDERING
GOODS & SERVICES
To
start shopping or arrange for dry cleaning/shoe repairs simply follow the
instructions provided by the participating
retailers - for now, these are:
The
Food Ferry Company Ltd
(home
delivery supermarket)
www.foodferry.co.uk or telephone 020
7498 0827
Berry
Bros & Rudd
(wine & spirit merchants)
www.bbr.com or telephone 0870 900 4300
Jeeves
of Belgravia
(laundry,
cleaning & shoe repairs)
www.jeevesofbelgravia.co.uk or telephone 020 8809 3232
London
Laundry Dry Cleaning Company
(laundry
& dry cleaning)
www.lldcc.co.uk or telephone 020 8540 1101
-IMPORTANT –
always state that you are a Homeport
shopper
always quote your master card ID number
(from the back of your master card and
user card/s.)
HOW TO USE HOMEPORT - QUICK REFERENCE GUIDE
(For
full instruction see relevant page in detailed guide)

Releasing your box (page 5)
- switch on Homeport
- hold user card target
against reader panel to access Homeport
- select ‘get new box’
- select ‘get box’
- pull cable to release
(keep cable straight whilst pulling)
Plugging the empty
box back in (page 6)
- switch on Homeport
- hold user card target
against reader panel to access Homeport
- push cable into empty port
- select ‘return box’
Getting the empty box
back again (page 7)
- switch on Homeport
- hold user card target
against reader panel to access Homeport
- select ‘get old box’
- pull cable to release
(keep cable straight whilst pulling)
Returning unwanted
goods or sending dry cleaning/mending away (page 7/8)
1.
switch on Homeport
2.
hold user card target against reader panel to access Homeport
3.
push cable into empty port
- select ‘return product’
Making your Homeport
more secure (assigning a PIN) – see page 9
Getting
access to your Homeport using a PIN – see page 12
Alien Boxes – see page 13
Need help? Telephone
020 7815 3440 and ask for ‘Homeport Help’
HOW TO USE HOMEPORT –
DETAILED GUIDE
Releasing your box.
When
you have received a delivery, this is how you release your box …
1. press
the on/off button.
Homeport will switch on.
The LCD display will look like this:
current time/current date
Battery [] [] [] []
Please, identify!
2. hold
the user card against the reader panel - the target design must be in contact
with the reader panel.
Homeport will read your card and identify
it.
The LCD display will look like this:
Please, wait!
After
a short time Homeport will identify your card, then it will display the main
menu
The LCD display will look like this:
Get new box
Get old box
Fixed box/es
Select back
3. press
the 'left selector button' to activate the chosen command 'get new box'
The LCD display will look like this:
[] [] []
get
box back
… and
one of the port lights will flash to indicate which port lock is ready to open.
4. press
the 'left selector button' to activate the chosen command 'get box'
Homeport will buzz as it unlocks the port.
5. grasp
the cable and pull it firmly towards you to release your box. Try to keep the cable as straight as
possible, or it could fail to release.
6. Unpack at your convenience …! (Homeport will turn itself off)
Plugging the empty box back in.
After
you have unpacked your box, plug the empty box back in as soon as possible.
This is how you plug the empty box back into Homeport ready for collection by
the retailer…
1. press
the on/off button.
Homeport will switch on.
The LCD display will look like this:
current time/current date
Battery [] [] [] []
Please, identify!
2 hold
the user card against the reader panel as before
Homeport will read your card and identify
it.
The LCD display will look like this:
Please, wait!
After
a short time Homeport will identify your card, then
The LCD display will look like this:
Get new box
Get old box
Fixed box/es
Select back
3. make sure that the cable is attached to the
box, then firmly push the spike lock (ie the end of the cable) into any empty
port lock - it doesn't matter which one.
The LCD display will look like this:
OK !
box accepted
Then the LCD display will change
automatically to :
Return box
Return product
Return box
Select back
4. press
the 'scroll down button', until you arrive at the command 'return box'.
5.
press the 'left selector button' to activate the command 'return box'.
After
a couple of minutes, Homeport will turn itself off, keeping the box ready for
collection. You don't need to do
anything else.
Getting the empty box back again after you
have plugged it in
If you
decide that you need to return something to the retailer, but you have already
plugged the empty box back in, this is how you un-plug it again…
1. repeat
steps 1 & 2 from the section headed 'plugging the empty box back in'.
2. press
the 'scroll down button' until you arrive at the command 'get old box'
3. press
the 'left selector button' to activate the command 'get old box'
Homeport will buzz as it unlocks the port
lock.
4. grasp
the cable and pull it firmly towards you to release your empty box.
5. place
the unwanted products in the box and repeat steps 1-3 from the section
'plugging the empty box back in'.
6. press
the 'scroll down button', until you arrive at the command
'return product'.
7. press
the 'left selector button' to activate the command, 'return product'
After
a couple of minutes, Homeport will turn itself off, keeping the products ready
for collection. You don't need to do
anything else.
Returning unwanted goods
If you
wish to return any of the products this is how you do it …
1. repeat
steps 1-3 from the section headed 'plugging the empty box back in'.
2. press
the 'scroll down button', until you arrive at the command 'return product'.
3.
press the 'left selector button' to activate the command 'return
product'.
After
a couple of minutes, Homeport will turn itself off, keeping the products ready
for collection. You don't need to do
anything else.
Arranging dry cleaning
Contact
the dry cleaner of your choice, from the list at the front of this guide.
The
dry cleaner will arrange to deliver a special box & cable to your Homeport.
NB: in order to use this service you will be required to
store the box at your home!
When
the box arrives, this is what you do …
- Follow instructions for releasing your box –
page 5.
- Put your dry cleaning in the box then plug it back in.
Follow instructions
for returning unwanted goods – page 7.
You must
re-use the dry cleaner’s cable as it contains a specific microchip.
- The dry cleaner will un-plug the box, remove your
cleaning and then plug the box back in.
- Follow instructions for releasing your empty box – page
5, then store it at home with its cable.
- Remember to plug your dry cleaning box into Homeport on
the day your cleaning is due to be returned to you.
Making your Homeport more secure
No one
can get access to your Homeport without your user card/s. This means that, as long as your cards are
safe, your delivery is safe when plugged into Homeport. However, you may wish to restrict the use of
the card to ensure that only you (and/or other nominated persons) can use
it. You can do this by activating the
PIN number facility. If you do this, the user card will only work if used in
conjunction with a PIN number created by you.
No one, including you, will be able
to get access to the Homeport without using the PIN. This is how you do it …
1.
press
the on/off button.
Homeport will switch on.
The LCD display will look like this:
current time/current date
Battery [] [] [] []
Please, identify!
2. hold
the master card against the
reader panel - the target design must be in contact with the reader panel.
Homeport will read your card and identify
it.
The LCD display will look like this:
Please, wait!
After
a short time Homeport will identify your card, then display the main menu
The LCD display will look like this:
Get new box
Get old box
Fixed box/es
Select back
3. press
the 'cursor down button' until you arrive at 'customer set up'.
4. press
the 'left hand selector button' to activate 'customer set up' command.
The LCD display will look like this:
Using PIN
Change PIN
Card status
Select Back
5. press
the 'left hand selector button' to activate the command 'using PIN'
The LCD Display will look like this:
Customer card: A
Using PIN: off
Change Back
6. press
the 'cursor up' or 'cursor down' button to select the card you wish to create a
PIN number for, eg 'customer card:A'
7. press
the 'left hand selector' button to activate the command 'Change'
The LCD Display will look like this:
Customer card: A
Using PIN: on
Change Back
8 press
the 'left hand selector' button to activate the command 'Back'
The LCD Display will look like this:
Using PIN
Change PIN
Card Status
Select Back
9 press
the 'cursor down' button until you arrive at 'Change PIN'
The LCD Display will look like this:
Customer Card: A
Cust PIN: 00001111
NEW BACK
10 press
the 'left hand selector' button to activate the command 'NEW'
The LCD Display will look like this:
New: 0
Verify:
---------------------
NEXT VERIFY
11 press
the 'cursor up' or 'cursor down' button to select a new number.
You will see the number 0 change to 1, and
so on up to 9
12 continue
scrolling until you arrive at the number you
want to select, then press the 'left hand selector' button to activate the command 'NEXT'.
You
have now changed the first number of the existing eight-digit PIN
(originally
00001111)
The cursor will now flash on the next
number of the eight-digit PIN.
You
can now choose to change the next number of the eight-digit PIN.
13 repeat
step 11 to change the next number of the eight-digit PIN. Continue to change each number in this way
until you have achieved your new personal PIN.
You may change as few or as many numbers as you wish.
14 Confirm
that you are happy with your new personal PIN by pressing the 'right hand
selector' button to activate the command 'verify'.
The LCD Display will look like this:
NEW: ******** (if you have only changed
one digit, you will only see one '*')
Verify: 0
----------------------------
NEXT OK
15 now
re-enter your new personal PIN, digit by digit, exactly as you did
in steps 11-13.
16 press
the 'right hand selector' button to activate the command 'OK'.
This
instructs Homeport to memorise your new personal PIN.
The LCD Display will briefly look like this:
**** OK ****
and then like this …
Using PIN
Change PIN
Card Status
Select Back
Your
Homeport is now only accessible via the user card & its corresponding PIN.
You
can make your additional user card/s more secure by using the PIN facility,
but you can only do this via the master
card.
Using
the master card to access the Homeport, you then select the card you want to
create a pin for (eg card A,B etc) - see step 6 in the above instructions.
Getting access to your Homeport using the
PIN.
Once
you have set up a PIN, you will have to use it each time you want access to
your Homeport. This is how you do it…
1. press
the on/off button.
Homeport will switch on.
The LCD display will look like this:
current time/current date
Battery [] [] [] []
Please, identify!
2. hold
the user card (which you have assigned a PIN to) against the reader panel - the
target design must be in contact with the reader panel.
Homeport will read your card and identify
it.
The LCD display will look like this:
Enter PIN: 0
NEXT OK (The
0 will be flashing).
3. press
the 'cursor up' or 'cursor down' button to arrive at the first digit of your
personal PIN.
4. press
the 'left hand selector' button to activate the command 'NEXT'.
Another flashing
0 will appear on the LCD Display.
5. repeat
steps 3 & 4 until you have keyed in all but the last digit of your personal PIN.
6. after
you have keyed in the last digit of your personal PIN press the 'right hand
selector' button to activate the command 'OK'.
The LCD Display
will look like this:
Please, wait!
Homeport will check your PIN and then
display the main menu:
Get new box
Get old box
Fixed Box(es)
Select Back
From this point, follow the relevant
instructions in this guide.
If you enter an incorrect PIN, the LCD
Display will say ‘pin code error – try
again’. You must then re-enter your PIN
to get access to Homeport.
Dealing with Alien Boxes
'Alien
Boxes' is a function which allows for human error on the part of the delivery
person. Imagine that the person
delivering your box has made a procedural mistake during the connection
process. If this is the case, as you are going through the process of releasing
the box, things will not go as expected -
The LCD Display will look like this:
ALIEN BOX!!!!!
Get
Box Keep
We
hope you won't ever be inconvenienced in this way, but if it does happen, this
is what you do …
1.
press the left hand selector
button to activate the command 'get box'
2. check
the contents of the box.
3. keep
the contents of the box if they are yours, or replace them.
4. plug
the box back in to any empty port lock.
5. press
the right hand selector button to activate the command 'keep box'
This instructs Homeport to keep the alien
box safe, awaiting collection.
6. contact
the retailer to report that you have an alien box in your Homeport.
You
don't need to do anything else.
Need help?
If you
find that, despite using this guide, you are having problems - and Homeport is
not behaving as it should, this is what you do …
Telephone
020 7815 3440 and ask for 'Homeport Help'